Installing a bathtub faucet might seem like a job only a pro can handle, but with the right tools and a little patience, you can definitely do it yourself.
Whether you are updating your bathroom’s look or fixing a leaky old spout, following a clear guide makes the whole process much smoother.
In this article, we will break down how to install bathtub faucet fixtures using the latest 2026 standards, ensuring your bathroom stays modern, leak-free, and efficient.
Before we dive into the steps, it is important to know that 2026 regulations now emphasize water conservation and lead-free materials.
Many new faucets are designed to meet the “SHOWER Act” standards, which focus on maintaining great water pressure while using less water.
Ready to get your hands a little dirty? Let’s get started.
Step 1: Gather Your Tools and Materials
You don’t want to be halfway through the job and realize you’re missing a wrench. For a successful how to install bathtub faucet project, you should have these items ready:
- New Bathtub Faucet Kit: Ensure it matches your existing plumbing (slip-on vs. threaded).
- Adjustable Wrench and Basin Wrench: For those tight spots behind the tub.
- Allen Wrench: Often needed for the tiny set screw on slip-on spouts.
- Plumber’s Tape (PTFE): To create a watertight seal on threaded pipes.
- Silicone Caulk and Caulking Gun: To seal the gap between the faucet and the wall.
- Screw Driver: Both flathead and Phillips.
- Cleaning Supplies: Rubbing alcohol and a rag to prep the pipe.
Step 2: Turn Off the Water Supply
Safety first! You must shut off the water before removing anything. Most bathtubs don’t have individual shut-off valves like sinks do, so you might need to turn off the main water valve for the whole house.
Once it’s off, turn the old faucet on to drain any remaining water in the pipes. It is also a smart idea to cover the tub drain with a towel.
This prevents small screws or tools from falling down the drain, which is a mistake even pros make sometimes.
Step 3: Remove the Old Faucet Spout
The way you remove the spout depends on the type you have. Look underneath the spout near the wall.
If you see a small hole with a screw, you have a slip-on spout. Use an Allen wrench to loosen that screw and pull the spout straight off.
If there is no screw, it is likely a threaded spout. In that case, grab it firmly with both hands (or a wrench if it’s stuck) and turn it counter-clockwise to unscrew it.
Be careful not to put too much pressure on the pipe inside the wall.
Step 4: Clean the Connection Area
Once the old faucet is out of the way, you’ll probably see some old caulk, rust, or mineral buildup. This is a crucial part of how to install bathtub faucet properly.
Use a putty knife or a rag soaked in rubbing alcohol to clean the copper pipe and the wall surface. If the pipe has rough edges or “burrs,” you can lightly sand them down.
A clean surface ensures that your new faucet fits perfectly and that the new caulk sticks well.
Step 5: Prepare the Pipe for the New Faucet
Now it’s time to prep the plumbing for the 2026-compliant fixture.
- For Threaded Connections: Wrap 2 to 3 layers of plumber’s tape around the threads of the pipe coming out of the wall. Wrap it clockwise so it doesn’t unspool when you screw on the faucet.
- For Slip-on Connections: You don’t need tape. Instead, apply a tiny bit of plumber’s grease to the pipe to help the new spout slide on smoothly without damaging the internal O-ring.
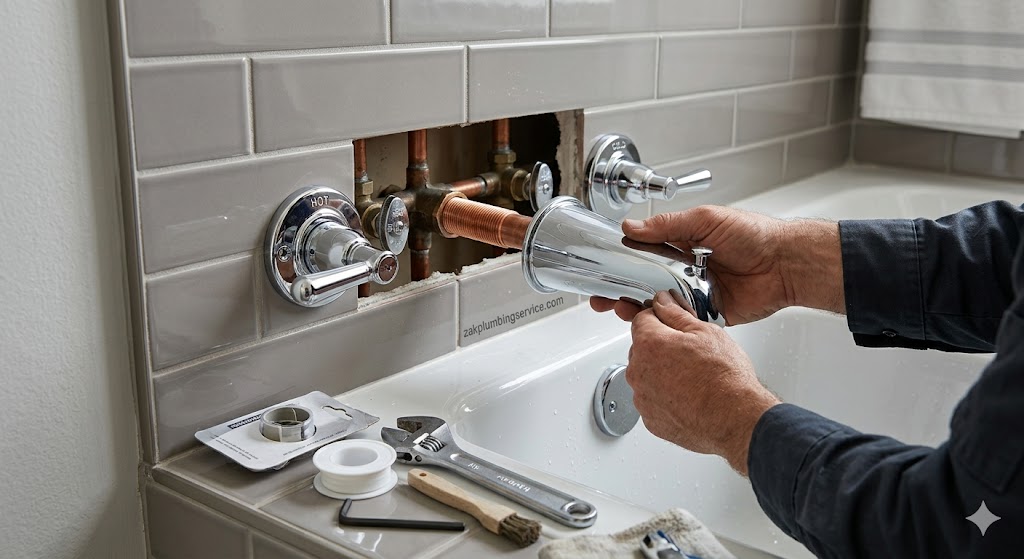
Step 6: How to Install Bathtub Faucet Spout and Handles
Take your new spout and align it with the pipe.
- Slip-on: Slide it onto the pipe until it sits flush against the wall. Tighten the set screw underneath.
- Threaded: Screw it onto the pipe by hand until it is snug and pointing straight down. If you need a wrench for the final turn, wrap the faucet in a cloth first to avoid scratching the finish.
If you are also replacing the handles, slide the new trim over the valve stems and secure them with the provided screws. Make sure everything is aligned and straight before moving to the final step.
Step 7: Seal and Test for Leaks
The final touch for a “professional finish” is the caulking. Apply a thin bead of bathroom-grade silicone caulk around the base of the faucet where it meets the wall.
This keeps water from getting behind your tiles and causing mold. Wipe away any excess with a damp finger for a clean look.
Finally, turn the water back on and test the faucet. Let it run for a minute and check everywhere for drips. If it’s dry, you’re all done!
Important Installation Details to Remember
Instead of a table, here are the key technical details you need to keep in mind for a 2026-standard installation:
- Flow Rate Standards: In 2026, many regions require faucets to have a maximum flow rate of 2.5 GPM (gallons per minute) to save water.
- Material Safety: Always choose faucets labeled as “Lead-Free” (NSF/ANSI 372 certified) to ensure your water stays safe for the family.
- Pipe Clearance: Ensure your copper pipe extends at least 2 to 4 inches from the wall, depending on your specific faucet model’s requirements.
- Sealant Cure Time: Silicone caulk usually needs 24 hours to fully dry before you should take a shower or get the area wet.
- Tools for Finish Protection: Always use a soft cloth between your wrench and the new faucet to protect PVD or matte finishes from scratches.
For More Details Visit Zak Plumbing Service Contact Page