There is nothing quite like the panic you feel when you open your washing machine and find a giant pool of grey water. It usually happens right when you are in a rush, or even worse, late on a Sunday night.
If your machine has stopped mid,cycle, you are likely staring at a tub full of soggy clothes. Don’t worry though, because learning how to drain water from washer is a skill every homeowner should have in their back pocket.
Even with the fancy new 2026 models hitting the market, drainage issues still happen to the best of us. Whether it is a clogged sensor or just a stray sock in the wrong place, we can fix this together.
At Zak Plumbing Service, we see this all the time, and most of the time, you can handle it yourself. Let’s walk through the steps to get your laundry room dry and your machine back in action.
Read: Stop the Leak: A Full Guide to Fixing Your Cracking Pipe in 2026
Understanding Why You Need to Know How to Drain Water From Washer
Before we grab the towels, it helps to understand why this happened in the first place. Modern 2026 washers are smarter than ever, but they are still prone to physical blockages.
Sometimes your machine’s AI might detect a “Drain Error” and just stop everything to prevent a flood. Here are the most common reasons your washer is holding onto that water:
- A Clogged Pump Filter: This is the number one culprit, as it catches coins, hairpins, and lint before they reach the pump.
- Kinked Drain Hose: If your machine shifted during a heavy spin, the hose in the back might be pinched shut.
- The 2026 Smart Sensor Glitch: Sometimes the new water,level sensors get confused by too many soap suds and need a hard reset.
- Broken Drain Pump: If you hear a loud humming or grinding sound, the pump motor might have finally given up.
- Lid Switch Issues: On top,loaders, a broken lid switch will tell the machine the door is open, so it won’t spin or drain.
Knowing these causes makes the fix much faster. Now, let’s get into the actual steps to clear out that water safely.
Read: Fluid Hammer Arrestor: What’s Behind the Buzz Right Now
Step 1: Safety First and Smart Sensor Prep
Safety is the most important part of any DIY plumbing job. You are dealing with water and electricity, which is never a good combination.
First, go ahead and unplug the machine from the wall outlet. If you can’t reach the plug because the machine is too heavy, head to your circuit breaker and flip the switch for the laundry room.
How to Drain Water From Washer by Disconnecting Power
Once the power is off, you need to check if your 2026 model has an emergency drain feature. Many newer machines now have a “Manual Override” button in their companion apps, but since we unplugged it, we are going old,school.
Grab a few old towels and a shallow container like a baking sheet or a Tupperware lid. You will be surprised how much water can hide in a “finished” load of laundry.
Lay the towels down around the base of the machine. It is better to have too many towels than to spend the next hour mopping up a mess.
Read: Breaking & Latest Update on P Trap: Big Update and Full Details
Step 2: Accessing the Gravity Drain or Pump Filter
For front,loading machines, there is usually a small door at the very bottom on the front. This is where the magic happens, and also where the smells usually come from.
Pop that door open using a flathead screwdriver or even just your finger. Inside, you will see a large circular cap and likely a tiny rubber hose.
Manual Techniques on How to Drain Water From Washer
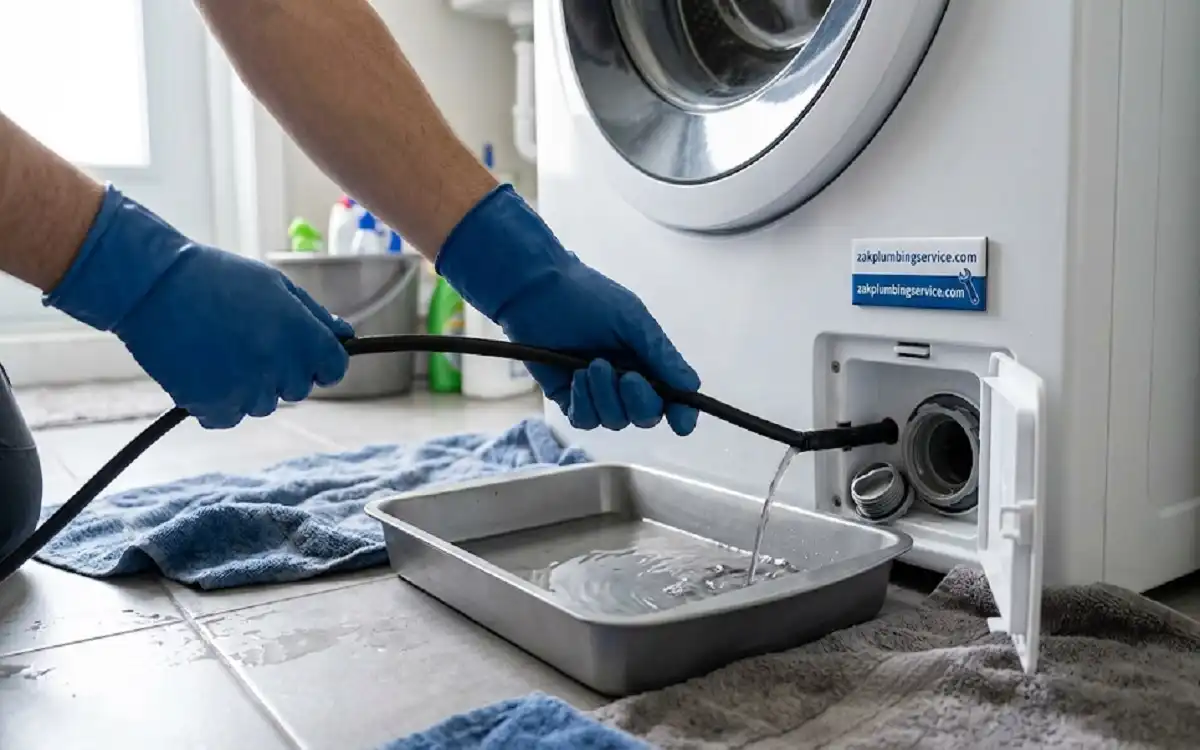
This tiny hose is your best friend right now. Pull it out gently, place your shallow tray under it, and remove the little plug at the end.
Water will start trickling out slowly, which is much better than a sudden wave. Once your tray is full, plug the hose, empty the tray, and repeat until the water stops.
If you have a top,loader, this process is a bit different. You might actually have to scoop the water out with a plastic pitcher or a heavy cup.
It is a bit of a workout, but it gets the job done quickly. Just make sure you get as much out as possible so the machine is light enough to move later.
Read: How Can I Clean Washing Machine: Big Update on Drum Health
Step 3: Dealing with the Drain Hose Clogs
If the water in the drum didn’t come out through the emergency hose, the problem might be further back. The drain hose is that big, ribbed pipe that goes from the washer into your wall or sink.
Pull the washer away from the wall slowly. You want to make sure you don’t pull any other hoses loose while you are moving it.
Check the hose for any sharp bends or kinks. Sometimes the machine just vibrates itself into a position where it is literally “stepping” on its own hose.
If the hose looks fine, disconnect it from the back of the machine. Keep a bucket ready, because if the clog is right at the exit, water will come rushing out immediately.
Take the hose outside and run a garden hose through it. If a “clog” of lint or a lost baby sock flies out, you have found your winner.
Read: Plumbers Putty: 7 Essential Tips for the Best Leak-Proof Seal
Step 4: Cleaning the 2026 Eco-Filter Systems
The newer 2026 models often feature high,efficiency microplastic filters. These are great for the planet, but they can clog up faster than the old versions.
Go back to that front access panel we opened earlier. Now it is time to unscrew the large circular cap, which is the main pump filter.
Warning: Have your bucket ready because a good amount of water will spill out when you twist this. Turn it slowly, like you are opening a bottle of soda that you know is going to fizz.
Once it is out, you will probably see a “nest” of hair, coins, and soap scum. It is gross, I know, but cleaning this out is the key to fixing your flood.
Rinse the filter under warm water in a different sink. Make sure the inside of the pump housing is clear of any debris before you screw the filter back in.
If you leave even a tiny bit of grit on the threads, it might leak later. Tighten it firmly, but don’t overdo it or you might crack the plastic.
Read: Septic Tank Service: 5 Proven Tactics to Avoid a Costly Disaster
Step 5: Testing the Reset and Smart Cycles
Now that everything is clean and dry, it is time to see if our hard work paid off. Plug the machine back in and wait for the lights to come on.
Most 2026 machines need a “soft reset” after an error. Usually, you can do this by holding the “Start” and “Power” buttons at the same time for five seconds.
Check your user manual to be sure about your specific model’s reset code. Once it’s back online, select the “Drain and Spin” cycle.
Listen closely as the machine starts up. You should hear the pump kick on with a clear, humming sound, followed by the sound of water moving through the pipes.
If the water disappears and the clothes start spinning, you have successfully fixed it! You just saved yourself a lot of money on a service call.
If the machine just sits there and hums without moving water, the pump motor itself might be dead. This is usually when you should give us a call at Zak Plumbing.
Read: Water Softener Service: 10 Essential Hacks to Fix Your Hard Water Fast

Key Maintenance Points to Prevent Future Floods
Instead of waiting for the next flood, you can do a few things to keep your machine running. Maintenance is the secret to a long, lasting appliance.
- Monthly Filter Rinse: Make it a habit to clean that bottom filter every 30 days. It only takes five minutes and prevents 90% of drainage issues.
- Check Your Pockets: This sounds simple, but coins and hair clips are the enemies of your drain pump. Always double, check every pocket before the clothes go in.
- Use the Right Detergent: High,efficiency (HE) machines need specific soap. Using too much regular soap creates a “suds lock” that stops the pump from working.
- Run a Cleaning Cycle: Most 2026 washers have a “Self, Clean” or “Tub Clean” mode. Use a specialized cleaning tablet once a month to dissolve any hidden gunk.
- Inspect the Hoses Yearly: Every year, pull the machine out and look for cracks or bulges in the hoses. It is better to replace a 20 dollar hose than to fix a 2,000 dollar floor.
Read: Septic Tank Pumping Services Near Me: 5 Proven and Professional Local Choices
When to Call Zak Plumbing Service
We love a good DIY spirit, but sometimes a problem is bigger than a simple clog. If you have tried all these steps and the water still won’t budge, there might be an internal failure.
Internal blockages in the tub or a fried control board are tricky to fix without the right tools. Our team is trained on the latest 2026 technology and can get your laundry room back to normal in no time.
Don’t let a broken washer ruin your week. If you are feeling overwhelmed, just reach out and we will handle the heavy lifting for you.
We hope this guide helped you figure out how to drain water from washer without too much stress. Happy washing, and may your floors stay forever dry!
For More Details Visit Zak Plumbing Service Contact Page